Android Using Intent application
Android Using Intent application
Android Using Intent application
Seemingly ordinary most
strange, as hard as it is easy. Northern Song Dynasty. Wang Anshi
Actually, the most seemingly
ordinary things extraordinary, simply can not do a good job; success seem very
easy, and the success of the process was fraught with hardships.
For we believe that a very
common thing, dismissive, would never grow in, down to earth, just from the
success and step forward; success does not like to see so easy to find a
shortcut is not desirable, we often than others pay more hard work and effort.
Today we are speaking about
the principles and applications of the Android Intent.
Earlier we summarize a few
important components of Android, I believe we have been for these components
have a clear understanding, we look at a few common operations:
Start a Activity: Context.startActivity (Intent
intent);
Start a Service: Context.startService (Intent
service);
Binding a Service: Context.bindService (Intent service,
ServiceConnection conn, int flags);
Send a Broadcast: Context.sendBroadcast (Intent
intent);
We found that in these
operations, there is an Intent to participate, looks like a very important
component, so in the end Intent What is it?
In simple terms, Intent is
for data transfer between the various components of the system's data load.
When we need to make a call to action, we can tell by Intent Android system to
complete this process, Intent is to call an operation notification.
Intent has several important
attributes, here we will be introduced one by one:
1.action, actions to be executed
For the following statement of Activity:

TargetActivity stated in its
<intent-filter> in the <action>, ie, the target action, if we need
to make a jump action, you need to specify the target in the Intent of the
action, as follows:

When we specify the
appropriate action for the Intent, then call startActivity method, the system
will jump to the corresponding Activity according to action.
In addition to the action
custom, Intent also contains a number of default action, just to name a few:

Every action has its specific
purpose, the following will use to them.
Additional information 2.data
and extras, that is to be operated to perform data movement and delivery to
destination
Here's give an example to
interact with the browser:

The above two methods are the
start the browser and open the specified web page, keyword search,
corresponding to the action is Intent.ACTION_VIEW
and Intent.ACTION_WEB_SEARCH, the former need to specify the page address,
which is required to specify the key information for critical word search, the
browser will follow the default search engine set up their own search.
We note that when you open
the page, specify a data attribute of Intent, which is actually designated to
operate the data is in the form of a URI, we can convert a specified string
prefix to a specific URI types, such as: " http: "or" https:
"represents the network address type," tel: "indicates the phone
number type," mailto: "indicates the type of e-mail addresses, and so
on. For example, we want to call a given number, you can do this:

So how do we know whether or
not to accept such a target prefix it? This requires a look at the matching
rules target <data /> element of the.
Target <data /> tag
contains the following sub-elements, they define the url matching rules:
android: scheme matches the url prefix, in addition to the
"http", "https", "tel" ..., we can define your
own prefix
android: host url match the hostname portion, such as
"google.com", if defined as "*" indicates that any host
name
android: port to match the port url
android: path matches the url path
We change what TargetActivity
Footnotes:

If you specify only action at
this time is not enough, we need to set the data value, as follows:

At this time, url and
TargetActivity each part of all configuration information is consistent jumps
succeed, otherwise it is rejected by the system.
We android: path = "/
target" is amended as android: pathPrefix = "/ target", and to
meet the above requirements.
And during the search, we use
a putExtra method, the keyword is placed as a parameter Intent, we become
extras (additional information), there involves a Bundle object.
Bundle and Intent has a close
relationship, it is mainly responsible for the Intent to save additional
parameter information, which implements the android.os.Paracelable interface
internally maintains a Map property type, with key pairs used to store
additional parameters. When placing additional information in our use of
putExtra Intent, the method checks the default Bundle examples is not empty, if
empty, then create a new Bundle instance, and then place the specific parameter
information to Bundle instance. We can also create your own Bundle object, you
can then specify the Bundle of Intent, as follows:

It should be noted that,
after using the method set putExtras Bundle object, not a reference to the
operating system, but the copy operation, and then change the data so bundle
instance after you have finished setting will not affect the interior of Intent
additional information. How do we get the additional information provided in
the Intent of it? Corresponding is, we need to get to the Bundle instance of
Intent, and then removed from the key information corresponding to:

Of course, we can also use
the Intent of getIntExtra and getStringExtra method to obtain, the data sources
are in the Bundle Intent instance of an object type.
Earlier we relate to the
three attributes of Intent: action, data and extras. In addition, Intent also
includes the following properties:
3.category, to implementation of the objectives of the
action or behavior traits have classified
For example: there are
usually configured in our application main interface Activity:
Activity on behalf of the
target task is the application resides in the initial Activity and the list
appears in the application launcher in the system.
Several common category is as
follows:
Intent.CATEGORY_DEFAULT
(android.intent.category.DEFAULT) default category
Intent.CATEGORY_PREFERENCE
(android.intent.category.PREFERENCE) indicates that the target Activity is a
preference interface;
Intent.CATEGORY_BROWSABLE
(android.intent.category.BROWSABLE) specified after this category, click on the
image on the page or link, the system will consider the inclusion of this
objective Activity optional list for the user to choose to open a picture or a
link.
When setting the category of
Intent, you should use addCategory (String category) method to add categories
of information specified in the Intent to match the declared goal of Activity
in this category.
4.type: To perform a MIME data type of the target
actions can handle Activity
For example: a picture of the
target can be handled include such mimeType Activity in its statement:

When using Intent match, we
can use setType (String type) or setDataAndType (Uri data, String type) to set
mimeType.
5.component, package or class name of the target
component
When using the component
matching, generally use the following forms:

Among them, the first two are
used to match the target in the same package, and the third is used to match
the objectives of the other package. It should be noted that, if we specify
component properties in the Intent, the system will no longer be on the action,
data / type, category match.
Android launchMode
Android launchMode
Android launchMode
Encircle the wood, was born
Haomo; nine of the units, from the tired soil; a thousand miles begins with one
step. "I"
Today in the community to see
a friend asked, "how to become a top architect within six months,"
the netizen Road "turn off the lights to sleep, not six months ...",
indeed, a dream has come faster. As a programmer, set ambitious goals are
admirable, but not just to dream, to practice step by step down. Into a major
event, we must start from the little things; everything suddenly starting to
micro, quantitative cause a qualitative change.
We talk about today is four
launchMode Activity of.
Activity launchMode play in
multiple jumps during an important role, it can decide whether to create a new
Activity instance, whether to reuse existing Activity instance, whether other
public Activity instances where a task. Here's a brief introduction to the
concept of task, task stack structure of an object having a task can manage
multiple Activity, launch an application, it creates a corresponding task.
Activity There are four launchMode:
1.standard
2.singleTop
3.singleTask
4.singleInstance
We can configure
AndroidManifest.xml <activity> the android: launchMode property to more
than one of the four can be.
Here we introduced one by one
with an example of these four lanchMode:
1.standard
standard mode is the default
start-up mode, not the <activity> Configuration android: launchMode
property can, of course, you can also specify a value standard.
We will be an Activity, named
FirstActivity, to demonstrate what the standard startup mode. FirstActivity
code is as follows:

We FirstActivity TextView
interface for displaying the current sequence number Activity instance, Button
used to jump to the next FirstActivity interface.
Then we click on the button
several times in a row, there will be the following phenomenon:

We noted instances of
FirstActivity, but the serial numbers are different, and we need to
continuously press the Back button twice to return to the first FristActivity.
Principle standard mode as shown below:

As shown, the system will
generate a jump every time a new instance of the task FirstActivity, and put on
top of the stack structure, and when we press the Back button to see the
original FirstActivity instance.
This is the standard start-up
mode, with or without pre-existing instance, generates a new instance.
2.singleTop
We android specified property
on the basis of the above for the <activity>: launchMode =
"singleTop", the system will start mode processing in accordance with
singleTop jump behavior. We repeat the above several actions, there will be the
following phenomenon:

We see the results vary with
the standard three sequence numbers are the same, are used to say the same
FirstActivity instance; if you press the back button, the program quits
immediately, indicating the current stack structure is only one instance of
Activity ʱ?? Principle singleTop mode as shown below:

As shown above, when the
system will first look for a jump in the stack structure to see if there is an
instance of positive FirstActivity top of the stack, if there is no longer
generate new, but directly. Maybe my friends have doubts, I only see the stack
is only one Activity, if it is more Activity how to do, how, if not in the
stack? We followed through an example to confirm what everyone's questions.
We then create a new Activity
named SecondActivity, as follows:

Then the code before
FirstActivity Jump to:

Yes, FirstActivity will jump
to SecondActivity, SecondActivity will jump to FirstActivity. Demo results are
as follows:

We see two FirstActivity
serial number is different, proved to jump from SecondActivity FirstActivity
generate a new FirstActivity instance. Schematic is as follows:

We see that when the jump
from SecondActivity to FirstActivity, the system finds there FirstActivity
instance, but not at the top of the stack, then re-generate an instance.
This is singleTop start mode,
if there Activity instances corresponding right in the top of the stack, then
re-use, no longer generate new instance.
3.singleTask
In the above basis, we modify
FirstActivity attributes android: launchMode = "singleTask". The
results demonstrate the following:

We note that in the above
process, FirstActivity serial number is unchanged, SecondActivity serial number
is not the only, explanation jump from SecondActivity to FirstActivity, does
not generate a new instance, but to jump from FirstActivity SecondActivity When
generating a new instance. Schematic singleTask mode as shown below:

In the bottom half of the
figure is to jump to the results of the stack structure SecondActivity
FirstActivity after changes, we note that, SecondActivity disappeared, yes, the
jump in this process, the system found FirstActivity instance exists, so longer
generates new examples, but the Activity instance FirstActivity all over the
stack, the stack becomes FirstActivity object to display to the foreground.
Maybe my friends have questions, if you will SecondActivity also set to
singleTask mode, SecondActivity instance is not uniquely it? In our example
this is not possible, because every time you jump from SecondActivity to
FirstActivity, SecondActivity instance when forced out of the stack, jump to
the next and so on FirstActivity SecondActivity, can not find the presence of
SecondActivity instance, then you must generate the new instance. But if we
have ThirdActivity, let SecondActivity and ThirdActivity another jump, then
SecondActivity instance can guarantee unique.
This is singleTask mode, if
there are corresponding Activity instance, makes this Activity Other Activity
Examples Example above all out of the stack, so this Activity instance a stack
object display to the foreground.
4.singleInstance
This startup mode is rather
special, because it would enable a new stack structure, Acitvity placed in the
new stack structure, and ensure no other instance enters Activity.
We modified FirstActivity of
launchMode = "standard", SecondActivity of launchMode =
"singleInstance", as it relates to multiple stack structure, we need
to show id current stack structure in each Activity, so we add the following
code for each Activity:

Then we'll show you the
process:

Activity instances we found
that the two were placed in a different stack structure, on singleInstance
principle is as follows:

We see the jump from
FirstActivity to SecondActivity, re-enable a new stack frame, to place
SecondActivity instance, and then press the Back key, to return to the original
stack structure; the figure jumped again in the bottom half of SecondActivity
Go FirstActivity, this time the system will generate an original stack
structure FirstActivity instance, and then rolled back twice, attention, and
did not quit, but returned to the SecondActivity, why? Because the jump from
SecondActivity to FirstActivity time, our starting point into a stack structure
where SecondActivity instance, this way, we need to "return" to the
stack structure.
If we modify the launchMode
FirstActivity value singleTop, singleTask, singleInstance any one, the process
will be as shown:

singleInstance startup mode
is probably the most complex a model, in order to help you understand, I give
an example, if we have a share applications, which is the entrance
ShareActivity Activity, Activity also calls for other applications, we put the
Activity of Start mode is set to singleInstance, then call in other
applications. We edit ShareActivity configurations:

So then we start the Activity
in other applications:

When we open ShareActivity
then press the Back button to return to the original interface when,
ShareActivity exist as a separate entity, if the time we open share
applications, without having to create a new instance of ShareActivity to see
the results, because the system will automatically find, It exists directly.
You can print in ShareActivity about it taskId, to see the effect. On this
process, the principle is as follows:

Android using HTTP service
HTTP service
Android using HTTP
service
In Android, in addition to
using java.net package under the API to access HTTP services, we also can
change a way to complete the work. Android SDK comes with Apache's HttpClient
API. Apache HttpClient is a complete HTTP client, which provides full support
for the HTTP protocol, you can use the HTTP GET and POST access. Here we
combine instance, tell us about the use of the HttpClient.
Http we create a project, the
project structure is shown:

In this project, we do not
need any of Activity, all operations are done in the unit test class
HttpTest.java in.
Because the use of the unit
test, so here to tell us about how to configure the Android unit testing. All
configuration information is done in AndroidManifest.xml:

Then, our unit test class
needs to inherit android.test.AndroidTestCase class, which itself is inherited
junit.framework.TestCase, and provides getContext () method is used to get
Android context, this design is very useful because many Android Context API
are required to complete.
Now let's look at our test
case, HttpTest.java code is as follows:


Because this file contains
three test cases, one by one so I will explain.
First, note that we use when
positioning server address to the IP, because there can not be localhost, the
server is running on the windows, and this unit test run in the Android
platform, it means that if you use localhost to access the interior Android
services may not be accessed, it must use IP to location services.
We first analyze testGet test
cases. We use a HttpGet, request parameters directly attached to the back URL,
then perform a GET request by the HttpClient, if the response is successful,
made within the response stream as input and convert it to a string, and
finally determine whether the GET_SUCCESS.
testGet the corresponding
server-side testing Servlet code is as follows:

Then say testPost test cases.
We use a HttpPost, URL back and did not come with the parameter information,
parameter information is packaged into a form set by the NameValuePair type
composition, and then process the call after UrlEncodedFormEntity HttpPost of
setEntity method parameter settings, and finally executed by HttpClient.
testPost test corresponding
server-side code is as follows:

The above two are the basic
GET requests and POST requests, arguments are text data types, to meet the
needs of the ordinary, but in some situations, for example, when we use to
upload files, you can not use the basic GET and POST requests request, and we
want to use a multi-part POST request. Here's how to use multi-part POST
operations upload a file to the server.
Since HttpClient version
shipped with Android does not support multi-part POST request, so we need to
use a HttpMime open source project, this component is to deal specifically with
the MIME type of related operations. Because HttpMime HttpComponents is
included in the project, so we need to go to the official website to download
apache HttpComponents, then put them into the project to go HttpMime.jar
package, as shown:

Then, we observe testUpload
test, InputStreamBody processing document flow parameters we use HttpMime
provided with StringBody deal with ordinary text parameters, and finally all
the type parameters are added to a MultipartEntity instance, and this is set to
the POST request multipartEntity parameter entities, and then perform the POST
request. Servlet server code is as follows:


The service uses apache open
source project FileUpload processing, so we need to jar package
commons-fileupload and commons-io these two projects, the development of the
service side are not familiar with friends can go online to look at the
relevant information.
After the above described
three different situations, we need to consider a problem in practice, we can
not always create HttpClient, but should only create an HttpClient for the
entire application, and use it for all HTTP traffic. In addition, it should be
noted that multi-threading problems that may occur when passing through a
HttpClient also issued multiple requests. For these two issues, we need to
improve the look of our project:
1. Expand the system default
Application, and applied in the project.
2. Use
ThreadSafeClientManager HttpClient library provides to create and manage
HttpClient.
Project structure improved as
shown:

MyApplication which extends
the system's Application, the following code:


We rewrite the onCreate ()
method, when the system starts to create an HttpClient; rewrite the onLowMemory
() and onTerminate () method to close the connection at the end of insufficient
memory, and application, free up resources. It should be noted that, when
instantiated DefaultHttpClient, passing an instance from one ClientConnectionManager
ThreadSafeClientConnManager created, responsible for managing the HttpClient
HTTP connection.
Then, I want to let this
enhanced version of "Application" effect, you need to do the
following configuration in AndroidManifest.xml:

If we are not configured, the
system will default to android.app.Application, we added the configuration, the
system will use our com.scott.http.MyApplication, then you can call in the
context of the getApplication () to get the MyApplication instances.
With the above configuration,
we can apply in the event of, HttpActivity.java code is as follows:


Click the "execute"
button, the execution results are as follows:

Android application package using ANT
Android using ANT
Android application
package using ANT
Hello everyone, today to
share with you how to use ANT Android application package.
Usually we used to use
eclipse to develop Android program, it will automatically help us pack the
current application. If the Navigator view, we can see the following files:

In the figure above, com
package is placed in our class file, classes.dex a class file after the
conversion can be run on the dalvik streamline class file, resources.ap_ is
through packaged resource file, ant.apk is The final package file.
ANT to use the application
package, usually through the following steps:
1. aapt command generates
R.java file
2. generate the corresponding
java file with the command aidl
3. Use the javac command to
compile the java source files to generate class files
4. dx.bat converts class
files into classes.dex file
5. Generate resource package
file with the command resources.ap_ aapt
6. apkbuilder.bat packaging
resources and classes.dex files, generate unsigned.apk
7. jarsinger command apk
certification, generate signed.apk
In order to facilitate
understanding and memory, here to a flowchart to illustrate the above
processes:

Above is the whole process,
here we were made to explain in detail each of its parts, to figure out each
step.
We need to familiarize
yourself with each step using the command:
1.aapt (Android Asset
Packaging Tool) command to generate R.java file based resource file

Parameter Description:
-f Force overwrite the
existing file.
-m automatically generate the
appropriate package directory at the location specified -J.
-J Specifies R.java file
generated directory.
-S Specifies the resource
directory.
-M Specify the manifest file.
-I Introduced libraries.
Note that the location where
the ant our current project root directory, so many paths to enter, if
necessary, on command, the following example is the same.
2.aidl (Android Interface
Definition Language) commands to generate java files based .aidl definition
file

The above examples of the
location for the next com / scott / ant, according to package Person.aidl files
generated gen Person.java corresponding directory file, example only handle a
single document, the following will describe how to handle directory multiple
aidl files.
3.javac (Java Compiler)
command to generate a corresponding class file based on the source file

Parameter Description:
Location -d <directory>
specify where the generated class file
-bootclasspath <path>
Override location of bootstrap class files
Example and not take into
account the following libraries referenced class path, complex cases will later
encounter.
4.dx command to convert the
file into a class file .dex

The above example is to
convert the class file into the bin directory classes.dex file, the output to
the bin directory, we may use third-party libraries, you will see later on.
The resource file is packaged
5.aapt

Parameter Description:
-f mandatory coverage
-M Specify the Manifest file
-S Specifies the resource
directory
-A Specifies Inventory
-I Redistribute library
-F Specifies the package to
be generated
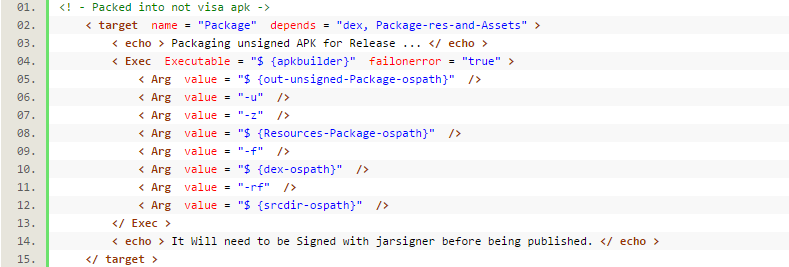
6.apkbuilder order, according
to documents and resources.ap_ classes.dex generated as visa apk package

Parameter Description:
-rf reference directory
structure of the source file
7.jarsigner command to
generate above apk package visa

In the process of visa, the
need to use the certificate file needs to be noted that the final release is an
alias for the certificate, on how to create a certificate, see below:
Of course, the above steps
can also be done using ADT provides a graphical interface in eclipse, the
selected item, right-click, "Android Tools => Export Signed Application
Package", then select one of the Keystore selection link "Create new
keystore", then follow the prompts Fill in the information on it.
These are the commands we
used to, then we ought to analyze the necessary ANT build.xml:
First we need to define a
large number of variable attributes, used to indicate the use of the path,
directories, etc., as follows:
   |
Then, we carried out step by
step, first, initialization:
 |
Second is to generate R.java
file:
 |
Followed aidl generate java
source files:
 |
We specify a framework.aidl,
which defines a lot of android built-in objects, then we specify aidl directory
and output directory, compiled after the group designated as aidl file suffix.
Next is the source file is
compiled into class files:
 |
If you use the third-party
libraries, we can configure the classpath tag.
Next it is to convert class
files into classes.dex:
 |
Like the above code, if the
use of third-party libraries, can be added in the form of final arguments into
account.
Then the resource file is
packaged:
 |
No visa is then packaged into
the apk package:
 |
Then is apk visa:
|
|
Last post:
 |
This completes the editing
build.xml, eclipse inherited the ANT, so we can run directly in the eclipse can
also call in your code.
First we need to download
ANT, then configure the environment variable information, and finally we called
with:
 |
Subscribe to:
Posts (Atom)