Android application
package using ANT
Hello everyone, today to
share with you how to use ANT Android application package.
Usually we used to use
eclipse to develop Android program, it will automatically help us pack the
current application. If the Navigator view, we can see the following files:

In the figure above, com
package is placed in our class file, classes.dex a class file after the
conversion can be run on the dalvik streamline class file, resources.ap_ is
through packaged resource file, ant.apk is The final package file.
ANT to use the application
package, usually through the following steps:
1. aapt command generates
R.java file
2. generate the corresponding
java file with the command aidl
3. Use the javac command to
compile the java source files to generate class files
4. dx.bat converts class
files into classes.dex file
5. Generate resource package
file with the command resources.ap_ aapt
6. apkbuilder.bat packaging
resources and classes.dex files, generate unsigned.apk
7. jarsinger command apk
certification, generate signed.apk
In order to facilitate
understanding and memory, here to a flowchart to illustrate the above
processes:

Above is the whole process,
here we were made to explain in detail each of its parts, to figure out each
step.
We need to familiarize
yourself with each step using the command:
1.aapt (Android Asset
Packaging Tool) command to generate R.java file based resource file

Parameter Description:
-f Force overwrite the
existing file.
-m automatically generate the
appropriate package directory at the location specified -J.
-J Specifies R.java file
generated directory.
-S Specifies the resource
directory.
-M Specify the manifest file.
-I Introduced libraries.
Note that the location where
the ant our current project root directory, so many paths to enter, if
necessary, on command, the following example is the same.
2.aidl (Android Interface
Definition Language) commands to generate java files based .aidl definition
file

The above examples of the
location for the next com / scott / ant, according to package Person.aidl files
generated gen Person.java corresponding directory file, example only handle a
single document, the following will describe how to handle directory multiple
aidl files.
3.javac (Java Compiler)
command to generate a corresponding class file based on the source file

Parameter Description:
Location -d <directory>
specify where the generated class file
-bootclasspath <path>
Override location of bootstrap class files
Example and not take into
account the following libraries referenced class path, complex cases will later
encounter.
4.dx command to convert the
file into a class file .dex

The above example is to
convert the class file into the bin directory classes.dex file, the output to
the bin directory, we may use third-party libraries, you will see later on.
The resource file is packaged
5.aapt

Parameter Description:
-f mandatory coverage
-M Specify the Manifest file
-S Specifies the resource
directory
-A Specifies Inventory
-I Redistribute library
-F Specifies the package to
be generated
6.apkbuilder order, according
to documents and resources.ap_ classes.dex generated as visa apk package

Parameter Description:
-rf reference directory
structure of the source file
7.jarsigner command to
generate above apk package visa

In the process of visa, the
need to use the certificate file needs to be noted that the final release is an
alias for the certificate, on how to create a certificate, see below:
Of course, the above steps
can also be done using ADT provides a graphical interface in eclipse, the
selected item, right-click, "Android Tools => Export Signed Application
Package", then select one of the Keystore selection link "Create new
keystore", then follow the prompts Fill in the information on it.
These are the commands we
used to, then we ought to analyze the necessary ANT build.xml:
First we need to define a
large number of variable attributes, used to indicate the use of the path,
directories, etc., as follows:
   |
Then, we carried out step by
step, first, initialization:
 |
Second is to generate R.java
file:
 |
Followed aidl generate java
source files:
 |
We specify a framework.aidl,
which defines a lot of android built-in objects, then we specify aidl directory
and output directory, compiled after the group designated as aidl file suffix.
Next is the source file is
compiled into class files:
 |
If you use the third-party
libraries, we can configure the classpath tag.
Next it is to convert class
files into classes.dex:
 |
Like the above code, if the
use of third-party libraries, can be added in the form of final arguments into
account.
Then the resource file is
packaged:
 |
No visa is then packaged into
the apk package:
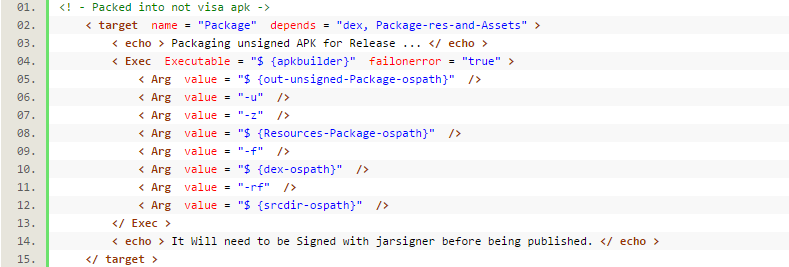 |
Then is apk visa:
|
|
Last post:
 |
This completes the editing
build.xml, eclipse inherited the ANT, so we can run directly in the eclipse can
also call in your code.
First we need to download
ANT, then configure the environment variable information, and finally we called
with:
 |


